Heatmap Generation
by Zebranky on Aug.12, 2010, under Technology
After seeing Georg Zoeller’s phenomenal talk on development telemetry at GDC, I had a bunch of ideas about data and interesting things to do with it. I’m still working on my streamlined bug reporting tool for NWN2 (ran into a wall dealing with IPC between C# and C++). This post, however, is about a much flashier, much more finished project.
In the presentation above, there were several screenshots of useful, good-looking visualizations of data, including heatmaps of things like crash locations and gameplay activity. I wanted to be able to make pictures like that! Problem is, I couldn’t find any code or libraries to do quite what I wanted, and rather fighting with what was out there, I decided to roll my own.
I wrote the core code a while ago, so I don’t really remember enough to post-mortem that. Much more recently, though, I felt unsatisfied with the “hacky” (to be generous) interface of one button in a form that ran the whole generation process when you clicked it. It was time to revisit the project.
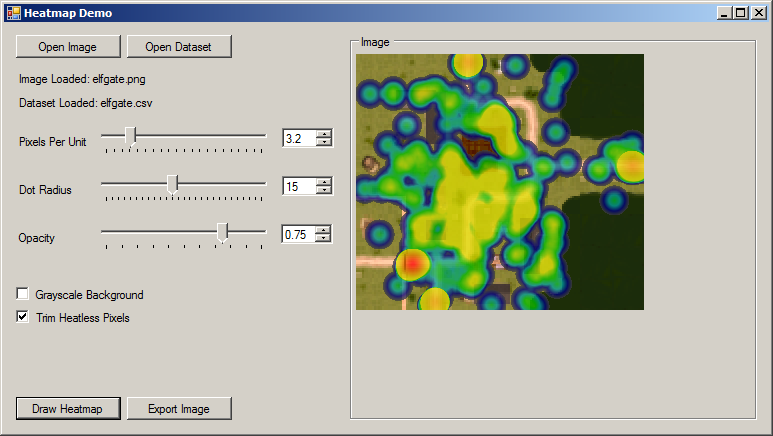
Most of the interface was just a matter of pulling several parameters to the HeatMap constructor out of code and into the GUI, but it makes me a lot happier to have a tool that other people can reasonably use. At this point, it’s abstract enough to be used for many applications beyond the original use case of plotting deaths on a NWN area minimap.
Besides that, I’m very happy with my approach to scaling the gradient for maximum contrast over the map. The data set mapped in this screenshot, for example, has a massive concentration of points at the gate near the bottom left, and relatively sparse concentrations almost everywhere else. The simplest approach to scaling the gradient is a linear transition from minimum to maximum heat values, but this results in a hot point at the large concentration and cool-looking points over the rest of the map.
I fought with a few different approaches before I realized that I could approach most data sets as being vaguely normal distributions (albeit often skewed left or right). This means percentiles are meaningful, and I can map them to particular points on the color gradient (e.g. dark blue is the 20th percentile, green the 60th, etc.). Rather than some of my dead-end approaches, which required manual tweaking to get a map that looks good, this allows the program to calibrate automatically to the shape of the data set, leaving just a few intuitive parameters to twiddle until the user is satisfied.
In the interest of minimizing the number of times the wheel must be invented, the (C#) code is available here. Do whatever you want with it, though I’d love to hear from you if you find it useful!
(As an aside, WordPress seems to change my C# tag to C++ whenever I save the post. Suppose I’ll do without for now.)

August 19th, 2010 on 11:25 pm
Hey,
Percentile mapping is the way to go – I ran into the same problem, e.g. writing the code from scratch, and ended up with a similar solution.
I’m using an indexed bitmap to map color to weight on the map, which has the benefit of being able to swap that bitmap out for different color schemes – which is useful when rendering on top of in-game minimap images of different color.
Mind if I link your article?
– Georg
August 19th, 2010 on 11:54 pm
Interesting. I rather like the “classic” colors, and I figured desaturating the background and tweaking the opacity is sufficient for most cases, but an arbitrary bitmap might be a good next step.
Feel free to link! As I said, there’s no sense in reinventing the wheel more than a few times
March 9th, 2011 on 2:03 am
Hey,
Just wanted to shoot you an optimization to your algorithm. On a 1024×1024 bitmap with 24 sampling points, speed increase is several orders of magnitude (1.8 sec down to 0.03 sec)
(a) Use a Dictionary to store the pixel intensity values.
(b) Use AddRange() to add the dictionary values to the sort list
(c) Use an empty, transparent bitmap sized like the target image instead of passing the target image through.
(d) Cut all opacity and GetPixel calls.
Instead, take the output image of the function (now a transparent bmp with the heat texture applied) and Draw it onto the area map image using DrawImage and and Image Attribute with a color matrix set
ColorMatrix cm = new ColorMatrix {Matrix33 = PointColorAlpha };
imageAttribute.SetColorMatrix(cm);
gTarget.DrawImage(m_LayerCache,
new Rectangle(0, 0, size.Width, size.Height), 0, 0, m_LayerCache.Width,
m_LayerCache.Height, GraphicsUnit.Pixel, m_textureAttributes);
(e) If opacity == 1, use DrawImageUnscaled instead, which is also several orders of magnitude faster than DrawImage
(f) If you want more speed and want to make the assumption that there is at least one pixel of zero intensity, only add pixels with >0 intensity to the dictionary and fix the min intensity at 0. That will shave another 10-20% of the rendering times.
March 9th, 2011 on 2:48 am
Additional note:
The dictionary method will get slower for samples with a large number of overlapping points, so at some point switching back to iterating over all pixels becomes faster. Switching between the two methods based on pixel distribution would provide optimal performance
March 9th, 2011 on 3:17 am
The crossover point is roughly at dotscale * heatmappoints = 6000
March 9th, 2011 on 3:31 am
sorry, typo, 26.000
July 8th, 2011 on 2:15 pm
I’m interested in playing with this code. Do you have a sample data set that I can use? Or at least documentation of the format of the dataset file?